Monday, July 20, 2015

Working on windows - pop ups, back button, new window etc

-  To click on Back button

Browser("Demoqa | Just another").Back


 12/18/15:

Windows that are open will have sessions, (mostly like in ordinal identifier) in object repository you could find it.

Sunday, July 19, 2015

WebCheckBox

- we use set method and value "ON" or "OFF" to select the checkbox

  'returns objects
 set obj = Browser("Sample Email Forms - myContact").Page("Sample Email Forms - myContact").WebTable("Send To: * Marketing Departmen").ChildItem(1,1,"WebCheckBox",1)

'Browser("Sample Email Forms - myContact").Sync

 obj.set "ON"

Support

- Download the help:

Go to Help -> HP United Functional Test Help -> vb script reference link

Here you have list of Methods, Syntax and Examples where you have clear description on each of them.

Properties(VB script)
Statement(VB script)


- 7047794679 – Vinu
This is a Groupin linked in, where yu can post any of ur UFT queries.

-  HP site: Forum where you can post questions related to HP tools and answers from users.

http://h30499.www3.hp.com/t5/Unified-Functional-Testing/You-do-not-have-permissions-to-run-tests-on-this-machine-You-can/m-p/6724752/highlight/false#M9053


Synchronization

Source: http://www.tutorialspoint.com/qtp/qtp_synchronization.htm

What is Synchronization?

Synchronization point is the time interface between Tool and Application under test. Synchronization point is a feature to specify delay time between one step and another of the test script.
For Example, clicking on a link may load the page is 1 second, sometimes 5 seconds or even it might take 10 seconds to load it completely. It depends on various factors such as the application server response time, network bandwidth , client system capabilities etc.
If the time is varying then the script will fail unless the tester handles these time differences intelligently.

Ways to Insert Sync Point:

  • WaitProperty
  • Exist
  • Wait
  • Sync(only for web based apps)
  • Inserting QTP Inbuilt Synchronization points.
Let us say we need to insert a sync point beween clicking on "numbers" link and clicking on "simple Interest" calculator of in "www.easycalculation.com". We will now take a look at all the 5 ways to insert sync point for the above scenario.

Method 1: WaitProperty

WaitProperty is a method that takes the property name, Value and Timeout value as input to perform the sync. It is a dynamic wait and hence this option is encouraged.
' Method 1 - WaitProperty with 25 seconds
Dim obj
Set obj = Browser("Math Calculator").Page("Math Calculator")
obj.Link("Numbers").Click

obj.Link("Simple Interest").WaitProperty "text", "Simple Interest",25000
obj.Link("Simple Interest").Click

Method 2: Exist

Exist is a method that takes the Timeout value as input to perform the sync. Again it is a dynamic wait and hence this option is encouraged.
' Method 2 : Exist Timeout - 30 Seconds
Dim obj
Set obj = Browser("Math Calculator").Page("Math Calculator")
obj.Link("Numbers").Click

If obj.Link("Simple Interest").Exist(30) Then
 obj.Link("Simple Interest").Click
Else
 Print "Link NOT Available"
End IF

Method 3: Wait

Wait is a hardcoded sync point which waits independent of the event happened or NOT. Hence usage of Wait is discouraged and can be used for shorter wait time such as 1 or 2 seconds.
' Method 3 : Wait Timeout - 30 Seconds
Dim obj
Set obj = Browser("Math Calculator").Page("Math Calculator")
obj.Link("Numbers").Click
wait(30)
Browser("Math Calculator").Page("Math Calculator").Link("Simple Interest").Click

Method 4: Sync Method

Sync Method can be used only for web applications where there is always a lag between page loads.
' Method 4 : 
Dim obj
Set obj = Browser("Math Calculator").Page("Math Calculator")
obj.Link("Numbers").Click

Browser("Math Calculator").Sync
Browser("Math Calculator").Page("Math Calculator").Link("Simple Interest").Click

Method 5 : Inserting QTP Inbuilt Synchronization points:

Step 1 : Get into Recording Mode. This Option Would be Disabled if the user is NOT in Recording Mode.
Step 2 : Goto "Design" → "Synchronization Point" .
Step 3 : We need to Select the object which we want to be the Sync Point. After Selecting the object, object window opens as shown below:
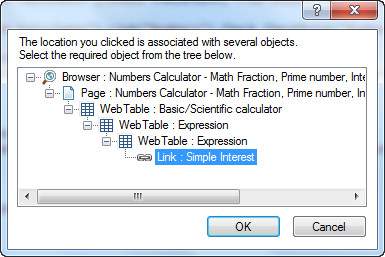
QTP Sync Point
Step 4 : Click Ok, the "Add Synchronization Window" Opens up. Select the Property, Value and Time out value and click ok as shown below:
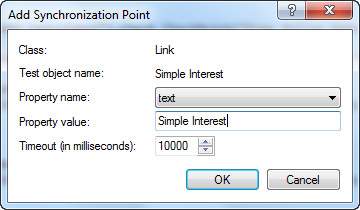
QTP Sync Point
Step 5 : The Script would be generated as shown below which is the same as that of the WaitProperty(Method 1) that we had already discussed:
Browser("Math Calculator").Page("Math Calculator").Link("Numbers").Click
Browser("Math Calculator").Page("Math Calculator").Link("Simple Interest").WaitProperty "text", "Simple Interest", 10000

Default Synchronization:

When user hasn't used any of the above sync methods, still QTP has inbuild Object synchronization timeout which can be adjusted by the user.
Navigate to "File" >> "Settings" >> Run Tab >> Object Synchronization Time out as shown below.
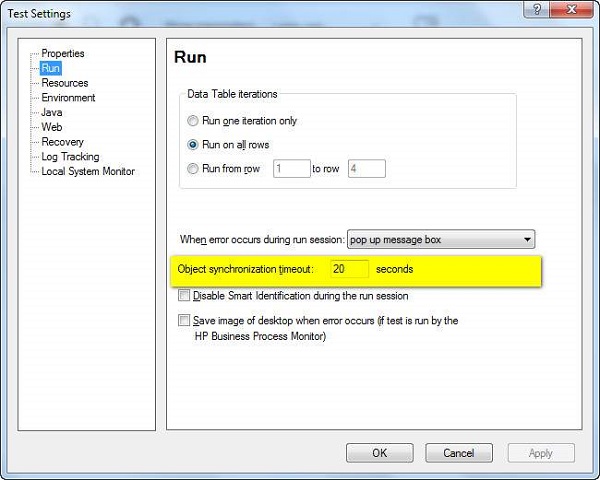
Default Synchronization Time Out

Thursday, July 16, 2015

UFT menu bar

 
In UFT, the toolbar buttons has been reduced that it was in QTP. Most of the toolbar buttons are not there.
The Figure below shows the new icons for the standard toolbar buttons than QTP 11. I am only discussing the icons which are relevant to QTP not for Service Test.
You can see the changes in the icons for New Test, Add Test and ALM Connection at standard toolbar.
Standard Toolbar
Standard Toolbar
Automation Toolbar contains buttons for Record, Run, Insert Call to Action, and Insert Check Point functionality. All theses icons has been changed.
Automation Toolbar
Automation Toolbar
Below figure explains the icons changed for different functionality in View Toolbar.
View Toolbar
View Toolbar
Toolbar buttons, that are not available in UFT are as below. I have mentioned the alternate menu option in UFT.
PrintPrint is no more available in UFT.
SettingsFile > Settings
CutEdit Submenu
CopyEdit Submenu
PasteEdit Submenu
Enable EditingFunction library context menu: Right-click the tab of a read-only function library in the document pane and select Enable Editing.
Web Service Testing WizardTools > Web Service Testing Wizard
Insert Emulator Synchronization StepDesign > Emulator Synchronization
Emulator WaitStringDesign > Emulator WaitString
UndoEdit > Undo
RedoEdit > Redo
Comment BlockEdit > Format > Comment
UnComment BlockEdit > Format > UnComment
FindSearch > Find
ReplaceSearch > Replace
Split ActionSplit is not relevant in UFT.
Step GeneratorDesign > Step Generator
Start TransactionDesign > Start Transaction
End TransactionDesign > End Transaction
Check SyntaxDesign > Check Syntax
OptionsTools > Options
Test FlowTest Flow is now Canvas in UFT.
Active ScreenView > Active Screen
Process GuidanceIt is not available in UFT.
To DOView > Tasks

Sendkeys -- an object to perform operations of keyboard

Sendkeys Method - Keyboard Oprations in QTP


What's the need of Sendkeys?

Set oShell = CreateObject("WScript.Shell")
SystemUtil.Run "D:\Program Files\Mercury Interactive\QuickTest Professional\samples\flight\app\flight4a.exe"
Dialog("text:=Login").WinEdit("attached text:=Agent Name:").Click
oShell.SendKeys "john"
Dialog("text:=Login").WinEdit("attached text:=Password:").Click
oShell.SendKeys "wrong "
Dialog("text:=Login").WinButton("text:=OK").Click

Copy this code in QTP and run it.

Okie.. Now you can see, because we have entered incorrect password, following error dialog will be displayed.


Now we need to close error dialog and enter correct password in the login window.

If do this using DP code, we need to get the properties of error window and write one more line of code.

Dialog("text:=Flight Reservations").WinButton("text:=OK").Click


Instead of addind more objects in our code and writing extra lines for this, we can simply press escape key (ESC) from keyboard and our job is done!!

How can we do that using QTP?


All you need to do is, create a Wscript object and then you can use Sendkeys for that purpose.

Set oShell = CreateObject("WScript.Shell")
oShell.SendKeys "{ESC}"

Done!!


This thing is very useful when application have no automation interface. And it's quite fast as well. Depends on the need.


Most keyboard characters are represented by a single keystroke. Some keyboard characters are made up of combinations of keystrokes (CTRL+SHIFT+HOME, for example).

Please note:-

- To send a single keyboard character, send the character itself as the string argument. For example,
- To send the letter x, send the string argument "x".
- To send a space, send the string " ".
- You cannot send the PRINT SCREEN key {PRTSC} to an application.


Examples:

  • oShell.SendKeys "{ESC}" - press escape key
  • oShell.SendKeys "john" - type john
  • oShell.SendKeys "+^{ESC}" - press Ctrl + Shift + Esc keys (open Windows Task Manager)
  • oShell.SendKeys "%{F}" - press Alt + F key (open file menu)


For details of all the characters, please refer the following table.


In case of any queries, please post your comments.

Wednesday, July 15, 2015

Eval & Execute


Difference between Eval & Execute

In the syntax above, both expression and statement arguments are string statements. Both expressions can be derived from VBScript or QTP code; the difference lies in the fact that Eval will always return the result of the string evaluation whereas Execute will execute a string statement for execution and will not retrieve the result (but there are workarounds). The following example demonstrates the main difference between the 2 functions:
x = 9
y = 10
 
bIsEqual = Eval("x = y")
Execute "x = y"
 
MsgBox "bIsEqual: " & bIsEqual
MsgBox "X is no longer 9. It is: " & x
bIsEqual
Eval Function
New x
Execute Statement
Note that Eval returned a Boolean value whereas Execute function performed a variable assignment. This article will cover the usage of both techniques in depth through both VBS and QTP code.
You must be wondering why the syntax for Eval and Execute is different. The reason is that, Eval is a function. Execute is not. That means, the following statement for Eval: bIsEqual = Eval("x = y"), when written for Execute will return a Null value for bResult (but assignment will be performed for x):
bResult = Execute("x = y")
MsgBox bResult
MsgBox "x: " & x
Null Output
Null Output
Value Assigned
X = 10
With that said, let me share the workaround that can be used with Execute to return the evaluation just like we did with Eval. Here’s how:
x = 9
y = 10
 
Execute "z = (x = y)"
MsgBox "z: " & z   ' how come its evaluating the 
Return Z (False)
Return Z (False)
More on this concept will be covered in the section Evaluating Statements.