Monday, November 16, 2015

Errors

11/16/2015:

- I have come across a scenario where I was getting the following error, while running the QTP script step by step???

Error in Watch Pane,  after then it is not responding .

The error was: ERROR HRESULT E_FAIL has been returned from a call to component

Some times while debugging UFT seems to be hanged(Not responding only for stop and pause button).
Ans:

Resolution 1:
http://community.hpe.com/t5/Unified-Functional-Testing/Getting-quot-error-hresult-e-fail-has-been-returned-from-a-call/td-p/6203589

Please clean re-install UFT following steps in next article with full admin rights on the machine as well as UAC & DEP disbaled:http://support.openview.hp.com/selfsolve/document/KM00319750


Resolution 2:
This is because UFT has a timeout when it come to waiting for a result and such calls in debug mode can fail because of a timeout. And then UFT has a bug that if the value evaluation timeouts then it just fails to stop or do anything.

Sunday, November 8, 2015

Web Event Configuration???

11/8/2015
Topics could be covered are:
- Configure Web Event Configuration
- Add, Delete and Modify web event Recording configuration

Topics:

- Know when to use Web Element Recording Configuration
- Modify existing Web Even Recording Configuration for web objects
- Creating Web Event Configuration file


Example of web Event Configuration:

Source: http://www.learnqtp.com/how-to-record-mouse-right-click-web-event-recording-configuration/

Click on the “Browse” button. Notice this click is not recognized by QTP. Please provide some feedback why QTP is not able to recognize this button. Thanks
This is an interesting question and not a typical object identification issue. I thought I will take it up on the blog to make it available to the wider audience.
If you go on the link mentioned above, you will see QTP is not able to record the click on Browse web button. Web buttons are generally associated with input type=submit object but if you see the source of the browse button, you will notice input type=file object.
qtp-type-file-type-submit
Now According to Microsoft helpinput type=file object creates a file upload object with a text box AND Browse button. Notice the AND. So, in case of input type=file, the text box and browse button are considered part of ONE object. There are no separate objects for QTP to identify.
What can we do to solve this issue?
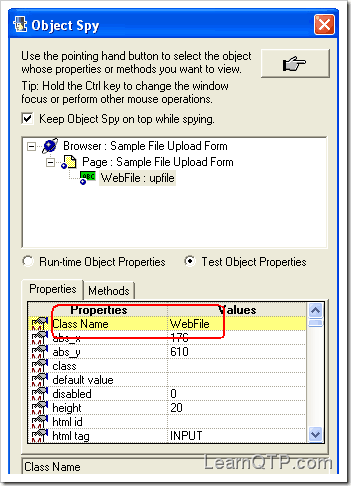
  1. Object Spy on the text box/ browse button object reveals that it is a WebFile type Object. QTP webfile object
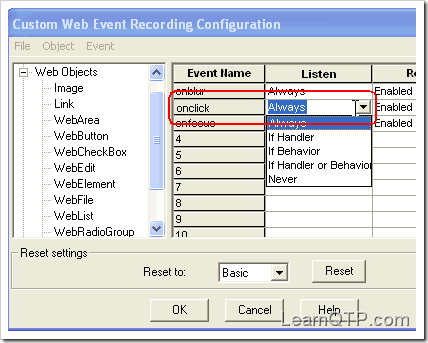
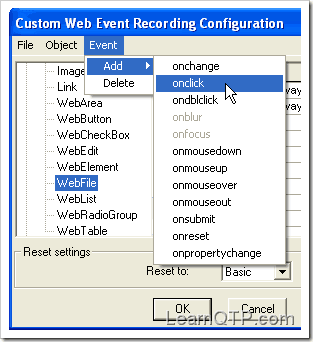
  2. Using Tools > Web Event Recording Configuration, go to WebFile (under Web Objects tree). Add onclick event. When QTP does not recognize buttons
  3. Set the onclick event settings to Always. Click ‘OK’.QTP onclick werc
  4. Done!. Record the click on browse button, now QTP should be able to identify the click on the button.

Step Generator

Note: Step Generator is used to reuse listed things and generate a code for the same. But for functions you need to add 'Call' keyword' after inserting functions and before running the script.

Note: In UFT, Step generator is located in Design in Menu bar.


11/8/2015

- Adding Test Objects
go to Insert - > Step Generator

Select Test Objects in the category drop down and the objects that you wanted to add script for.

Note: Looks like Step is used to create syntax/code for adding or doing operations on the test objects


- Adding Builtin Functions

go to Insert -> Step Generator

Select Functions in the category drop down.

- Adding Local Script Functions


- Adding Library Functions

Note: Library functions are listed only library functions are associated with the test. You could see same in the operations in Step generator window.(looks like Step generator(operation field) will also list library functions)

To have function library, the existing function in the script could be saved as seperate file extension .vbs.
Once .vbs file is created, associate it from the Settings section in menu bar. Once it is associated, in the Operations field in Step generator you could see the same.


Friday, November 6, 2015

Parameterization

11/6/2015

Parameterization using Action Parameters:
1. Add parameters to the action by going through Action properties -> Add Parameter


Parameterization using Data Tables


When you select the Data table in the Parameter section, the recorded code gets automatically updated with the parameters mentioned in the Keyword for the respective values.

Parameterization using Environmental Variable

File -> Settings- will see below window. In the Environment, select variable type as 'UserDefined'.

Use + to add variable names(Parameters) and values.


Once Environment variables are created, delete data in Datatables and modify the code as

.Set Environment.Value(<variable_name>)


Virtual Objects

11/6/2015:
Source: http://automated-360.com/qtp/virtual-objects-when-nothing-works/

When Nothing Works Virtual Objects is the weapon to achieve your goal. Many of the times you will find that QTP is not able to recognize an object, even if the object behaves like a standard object. Virtual objects helps in such situation, to be able to identify and run tests.
Virtual object feature in QTP enables us to create and run tests on objects that are not normally recognized by QTP. we can define such objects as virtual objects and map them to standard classes like button, checkbox etc.QuickTest emulates the actions on virtual object during the run session. A virtual object can be defined using the virtual Object Wizard. The wizard prompts you to select the standard object class to which you want to map the virtual object. You then mark the boundaries of the virtual object using a crosshairs pointer. Next, you select a test object as the parent of the virtual object. Finally, you specify a name and a collection for the virtual object. A virtual object collection is a group of virtual objects that is stored in the Virtual Object Manager under a descriptive name. Virrtual Object Manager feature enables us to create and manage virtual objects.

Source: Training
Ex:
- Creating virtual object for WinButton

1. Go to Tools menu->Virtual Objects ->New Virtual Object = Virtual object wizard gets displayed


2. Click on Mark Object and then take the icon to the object(here Login button) that you wanted to virtualize.

3. Click Next. -> Object configuration will be open. Ensure Parent Only radio button is selected.


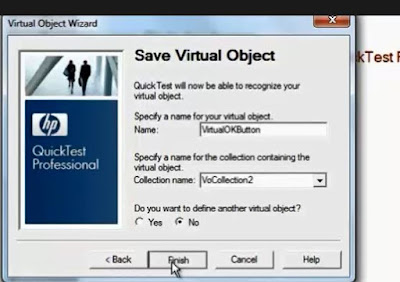
4. click Next. Enter the virtual button name. Click on Finish. Thats it Virtual object is created for Winbutton.


5. When you record the script, you would see the below script when user click on Login button.


So it means we could access the Login button using the name of the virtual object that we have created for it using wizard before running the script.(not used object repository or spy here)


Source: http://automated-360.com/qtp/virtual-objects-when-nothing-works/

Virtual Object Manager
Select Tools > Virtual Objects > Virtual Object Manager to open Virtual Object Manager.Virtual object manager list all of available virtual object collections. We can delete the virtual object from virtual object collections.

To disable recognition of virtual objects while recording select Tools > Options and click General tab, and select the Disable recognition of virtual objects while recording check box.
Tips
  • Object Spy cannot be used on virtual objects
  • Scroll bars and Labels cannot be treated as Virtual objects
  • QTP does not support virtual objects for analog or low level recording.